A home brewing oasis

Oasis Brewing

Oasis Brewing...... is our little garage based home brewery, where we brew all grain beers. And this blog is where we share information on our brewery setup, the beers we have brewed, along with other craft beer and home brew information.

Latest

Hop Spider

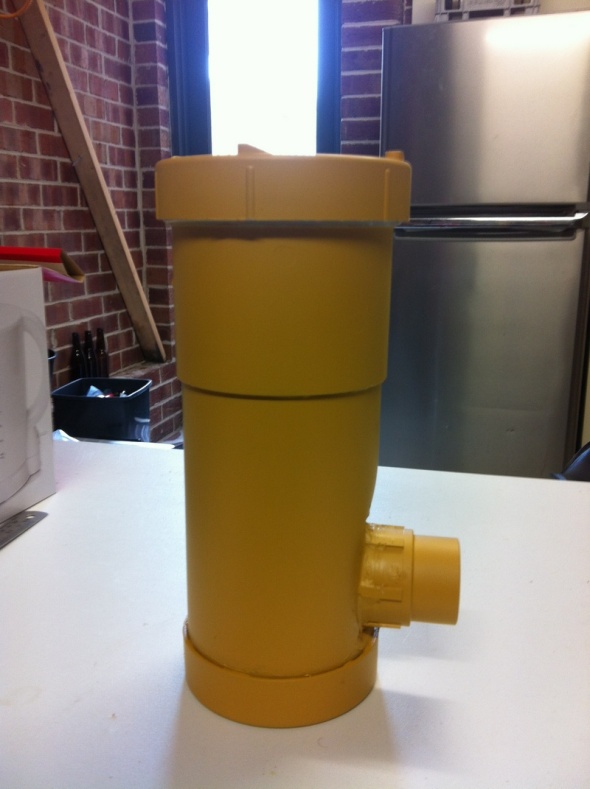
Here is my Hop Spider MKII. The first one I made had shorter bolts, probably a little too short and I knocked it into the urn on its maiden voyage.

While I panicked and looked around for something to grip onto it and fish it out it got hot in the boiling wort and consequently started to warp and buckle.

So I made another one with longer bolts. They are easy to make just make sure you use the thicker PVC fitting which I think is called DVW and is used for pressure pipe. Dont use storm water pipe fittings, they are too thin. I also used a paint strainer bag (Got all the items from Bunnings.)

When I throw my hops in I also throw in a stainless tap fitting to weigh the bag down a bit so the hops stay under the wort level. At the end of the boil I hang the hop spider above my urn until it drains out all of that “hoppy goodness”.

Hop Spider

Hex probe update

Finally got my new stc1000 temp probe from ebay. Ive used a push on air fitting and some nylon tube and the probe sits neatly inside. I siliconed up the end of the tube and the fitting is screwed onto the T piece on top of the hex coil outlet.

I fitted a connector to my STC1000 which allows me to swap probes between this one when Im brewing and the other one when Im fermenting a brew. I didnt really need to buy another STC1000 so this solution works best for me.

Hex temp probe placement

Fermentation fridge

Here is my fermentation fridge with about 17 litres of a Smoked Chocolate Porter fermenting away nicely. At the front you can see a piece of foam which covers the temp probe. The temperature controller is sitting on top of the fridge which is called an STC1000. Commonly available on ebay for under $20.00

The other lead goes around to my heating setup, which is just a small floodlight that I covered the glass over with a metal disc to keep out the light. It sits on the compressor hump inside the fridge and I have a 40 watt globe inside which provides enough heat to keep the chamber warm. This one is set to brew at 18C.  Its only 9C outside at the moment so its doing its job well.


Updated Brew Stand

Well I decided to update my brew stand because I love tinkering with things and trying to improve on what I aleady have. I needed a hose rack to store all of my hoses when not in use, but didn’t want to screw anything to the brickwork in the garage.

So the solution was to connect the top section of my hamerlok frame without the shelves. Then I drilled some holes in th front shelf bracket and put some long machine screws through the holes spaced about 20mm apart. Works great although I havent tested it out on brew day yet so dont know if the framework will get in my way or not.

I can also use the top section to hoist my bag out of the mash tun and let it drain before lifting it out.


New 40 litre urn

Well I picked up my new 40 litre urn tonight. it will mean I can do larger volume brews or at least do 20 litre batches without having to worry about evaporation loss and sparging during the boil. Should help improve the quality of my beers. You can see my Hex in the bottom and my hermit pump which will be used to pump hot water from the HLT on the bottom shelf up to the esky mash tun. Then it will recirculate through the Hex which is controlled by an STC1000 temp controller to maintain mash temps at 65C.

After mash out I pump into the boil kettle (my 40 litre urn) and begin the boil. In the meantime Ive heated another 9 litres of water in the HLT which is pumped into the mash tun for a batch sparge then this liquor is added to the boil kettle as well.

Heres a photo of it in place on the new brew stand.

Cheers

3v Brew stand

3V Brew stand

Heres my new 3V brewstand made form hammerlok shelving they were throwing out at work.

On the bottom left is my HLT and on the right is my pot I use for whirlpooling. (My kettle has an element which disrupts the whirlpool so I transfer into this pot to do my whirlpooling.)

On the top shelf is my esky mash tun and my boil kettle.


Image

From BIAB to 3V Herms

When I first started in all grain brewing I was using the brew in a bag method or BIAB. Its a great way for new brewers or extract brewers to move up to all grain. You only really need a 20 litre pot and a swiss voile bag.

http://www.aussiehomebrewer.com/forum/index.php?showtopic=11694

However it does have its limitations and due to this and some of my own procedural stuff ups, Ive decided to go to a 3V herms system. First step is to build a herms coil heat exchanger. More information here  http://www.aussiehomebrewer.com/forum/index.php?showtopic=63362

Hermit heat exchange coil

Hermit heat exchange coil